Saturday 28 March 2015

AAR: The Zareba at Handoub

At the last club night at Wyvern Wargamers, I put on a further game in my ongoing Sudan campaign. Bob and new Wyverner Furphy of ('Furphy's Brush with History' - check it out) took a British brigade each, while Dane took the Mahdists. It was a slightly smaller game than usual to fit in over a shorter evening, on e again using the ubiquitous Black Powder rules with my own modifications. 

The British briefing took up the story of the Anglo-Egyptisn expeditionary force after the games last October (wow, almost six months ago):
Your Anglo-Egyptian expeditionary force is to bolster its position at a Handoub throughout the construction of a zareba around a farmstead on the Eastern approaches to the town. This zareba form a staging post for future operations towards Berber on the Nile. The local Bija tribes have retreated to the foothills in recent days offering a chance for your troops to rest and recover from recent engagements. Mahdist incidents have been limited to night-time sniping from positions overlooking the town, the perpetrators melting away before pursuit

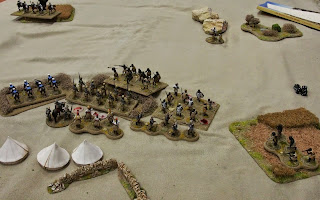
The British deployed around a central farmstead and half-constructed zareba, with two units out cutting the nearby acacia bushes to finish the work. The Mahdists had a choice of two of three entry points. 


As Beja skirmishers emerged from the low hills to the West, the outlying British units returned to for a defensive ring. 


The first wing of Mahdists arrives and Dane, typically direct, sends them surging towards the British lines. Dane had rightly marked the Bazingers in the zareba as the weak point (on their first outing no less! They come on, despite the murderous fire against them thinning their ranks. 


One group made it to the zareba itself and swept aside the doughty Bazingers, before crashing into the Indian troops alongside. With a second Mahdist wing entering, things looked decidedly precarious for the British defensive line!


More Mahdist fanatics plough on, with the British unable to bring heavy fire to bear because of the swirly melee. The KRRC that have garrisoned the farmhouse itself, find themselves trading fire with Mahdist skirmishers rather than the much more dangerous warbands. Despite repeated attempts to order them out to bolster the line to the east, they flatly refuse to budge. The shame! 


The KRRC are no help, but in the nick of time, the Naval Brigade troopers (who else?!) help the Indians push back the Mahdists that managed to storm the zareba and regain the defensive position. 


The second Mahdist wing hits the line and a second melee ensues. 


But the line holds. The last charge is stopped and with remnants and the overdue Baggara cavalry, the day is done for the Mahdists. The British position is held, a solid victory. 

Once again, Black Powder seemed to put on an entertaining game. The scenarios was a bit defensive for the British, which they should excel at but perhaps makes for a less interesting fame but after the first wave hit and the second arrived, I thought they were in real trouble. But calmly bringing fresh troops up in support ensured the compact position held in the initial melee and won the second rounds. 

I gather that Furphy enjoyed his (first ever) tabletop wargame - he's just been a painter to date but got chatting to the Wvyerners hosting a demo game at WMMS the previous week. Welcome the to club!

I've volunteered to out on a game at the annual Wyvern 'Day of Lard', where gamers from far and wide are invited to play too Fat Lardies games over a pleasant summer afternoon.  I'll switch to Sharp Practice for that - any suggestions on rules changes from anyone that's tried it with a later era would be warmly welcomed. 

Wednesday 25 March 2015

SCW Terrain - Vineyards Finished

Evening all,

It's been quiet around here, but I've been beavering away on various bits and pieces. First to completion has been these vineyards, built in anticipation of some 28mm Chain if Command Espana games this year. I made eight strips to give me a decent field of blocking terrain.


They were fairly simple if a little time-consuming to make - I used an up scaled and tweaked method that I found on someone's blog: http://empireofghosts.blogspot.co.uk/2015/02/tutorial-vineyards.html


For the build I used:
  • Bases: fat lolly sticks from Hobbycraft.  The same that I used for my recent 15mm hedgerows
  • Trees: Woodland Scenice tree armatures - from a bag of 114 deciduous  sized between 3/4" and 2" that I bought as 15mm scale trees. I used less than 20 of them because I cut a few larger armatures into two or individual stems.
  • End posts: a bag of cocktail sticks from Lakeland, chopped to length with a support piece cut to 45 degrees. I got some with a few grooves cut in them which helled when adding the twine. 
  • Twine:  black cotton thread liberated from the wife's sewing up box. 
  • Foliage: Woodland Scenics 'Olive green' bushes and 'Light green' clump foliage
  • Groundwork: Wilko cheap wood filler, sand and flock using my usual method. 


The step-by-step process, in brief as I didn't take any photos during the process (you may wish to consult my basing tutorial too).
  • Take lolly sticks, discarding any warped ones
  • Tidy up a selection of tree armatures - I trim the mold lines off (force of habit and pickiness for me  -  you many consider this optional)
  • Superglue four armatures fairly evenly along the length, keeping them fairly parallel with the base.  Cut larger armatures to desired size.These didn't have a base, so I drilled a hole carefully in the lolly stick and glued the stem into the hole for extra support. 
  • Carefully drill holes for the end posts using a suitable bit - some of mine split as I was doing it but I thought it worth pinning them in rather than just gluing on top. 
  • Cut cocktail sticks to desired length. Stick into the drilled holes with pva. Cut short supports to length, trim to 45 degrees (approximate). Glue supports on. Leave to dry. 
  • Bend armatures into suitable shapes. 
  • Slap on wood filler to disguise the bases for the armatures 
  • Wrap cotton thread around the groove of the cocktail stick, add a blob of superglue to hold. Bring along the length to the other end post, wrap and glue. Repeat so you have two runs of twine along each base. 
  • At this point I put a quick burst of black spray onto each side of the end posts so I wouldn't have to worry about coverage when painting. 
  • Add the ground texture - I apply pva then talus, sand and rocks to suit - I keep varying grades in separate tupperwares. I the. Used bulldog clips to pin each strip onto a baking tray - this (may?) minimise warping of the lolly stick base as the pva dries. 
  • I usually add a second layer of texture to cover anything I've missed (optional)
  • Leave to dry well, knock off any excess. 
  • Dropper on Woodland Scenics scenic cement to bind and seal the sand (optional)
  • Paint the groundwork, then the end posts and armatures to suit. 
  • Hot glue gun on the foliage. I started with an Olive green central clump then added Light green to the higher branches. Try to keep each bush fairly slim with definition between them. I think the smaller bushes look better than larger but ended up with a variety sizes. 
  • Pick off any excess foliage, tweaking the shape of the each row to suit
  • Trim off any dried glue on show or hide with more foliage
  • Dropper or spray on scenic cement to bind the foliage (optional)
  • Add flock and tufts to taste
  • Done!


I'm quite pleased with them - they fill a hole in the Spanish terrain collection and rather nicely evoke the region - much more so than wheat fields or ordinary woods.


Friday 13 March 2015

Challenge Distractions: Terraining

Keen-eyed followers of the AHPC may have noticed a drop-off in my productivity. As in 'dropped off a cliff'. After finishing the Carabineros I fancied a change, so hit the terrain as a 'brief' diversion. Too many days later, I've finished off these Jump-off Points for 15mm Chain of Command, era-appropriate supplied mounted on 40mm round mdf bases. 


These are really nice pieces, a set called 'stacked supplies' from Baueda, though I got mine from Magister Militum, who charged rather less postage. 


I have submitted them to Mr Campbell, as much to mark my lack of productivity, but he will no doubt 'zero' them as terrain pieces. Still, glad to get these off the table as CoC gets played regularly so I should really get fully equipped for it. 

I've also been building some new terrain fitting for the Spanish peninsula: some rows of vines to make a vineyard. While I have quite a bit of suitable terrain, it's due a refresh, I figure these will help evoke the region and nicely break up line of sight. 


They've progressed slightly more and are now ready for painting. Should be a quick job. With a 28mm Empress sculpt for scale. 


That's it for this week, but rest assured I've been trying to paint miniatures since - ready for the final challenge frenzy. 

Saturday 7 March 2015

Analogue Hobbies Painting Challenge V: February

February passed in a flash! And my challenge entries showed admirable persistence with the Spanish Civil War project. First up, the three leaders of the section:


Taking inspiration from Curt's idea of different base shapes for different roles/weapons within units, I've taken a simplified version by basing these on 30mm rather than 25mm round bases. This should help identify the leaders, oh so important for Chain of Command, on the tabletop. My weapon teams will be on 40mm-50mm bases I think.


The platoon is led by the Teniente (pimped with extra gold on his lapel and markings on his cuffs)


His second, Sargento Primero


And a section leader, Sargento, with an SMG to add oomph


The grind of painting output has been brightened by participants offering snaps of their painting stations. It's interesting how we all have different set ups to practice this craft - though having seen some others I think I need to reopen negotiations with the other half!

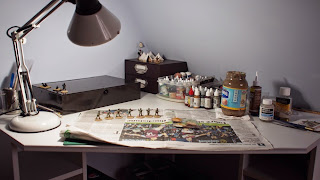
I currently paint in 'the hole', an a love under the stairs in the back bedroom. Not the best light there though, so I've got a decent daylight bulb to paint by. The corner desk is from ikea and has lots of useful storage for hobby supplies. You can see the challenge box file of prepped miniatures (now half empty).  


In the 'hole', entertainment comes from Netflix on the iPad or podcasts. I usually prep miniatures downstairs in front of the TV, often with the wife crafting nearby. So I've. A mobile prep station that I can just bung on top of a unit in the dining room. It is from Polish company Hobby Zone - much better design than most on the market, a very reasonable price - highly recommended.


February's second and final entry followed a trend: the last four Carabineros in tunics. These finish off the section.


Here's the whole crew together. I'm really chuffed how they came out, the Empress sculpts are fantastic and I think suit my painting style. I'm delighted with the distinctive grey-green that ties all of the various uniforms together.


A few have asked if I'm planning on any support for them, though much of the support will be drawn from Army units. I wasn't going to do a Hotchkiss MG specifically for the Carabineros and the CoC list doesn't permit an LMG. However I do have a Bilbao for them that might, just might make an appearance in the challenge.

These edged me over the 100 point 'Duel so Civil', but I am a long, long way off my 500 point target. Insufficient application throughout the challenge. Particularly, as I took a little detour, as my next post will detail...

Sunday 1 March 2015

AAR: Impromptu Chain of Command 10mm and Stalagbite!

I was up in Yorkshire the orther weekend seeing the brother Gharak. As usual these days we hadn't planned any gaming, but I'd thrown the 10mm WWII just in case. And lo, we found the time for not one but two game of Chain of Command on a 2'x4' board on the dining room table. All ranges were played as cm. 

The first, while tightly fought, saw Gharak's many MG42s seeing off my British platoon. For the second, I remembered to dig the camera out! 

After the patrol pahse. We were playing a flank attack, one that I've never played. I was very concerned about being pinned in on a hill from two sides, but just about managed to force a JOP near cover on the near short edge. 


The first sections deploy on facing hills and trade fire. Thankfully, Gharak hadn't indulged in panzergrenadiers again- I'm not sure I could have faced eight MG42s once again! 


Shock still starts to mount, but I'm winning the firefight - with fewer units on the table I could more reliably spend my order dice on trading fire. With two senior leaders, I could drop one down to take the worst of the shock off - Gharak didn't have that luxury. After a few phases, his section was forced off the crest of the opposite hill. 


Gharak pushed mechanised units down the table length and packs the woods with more troops. I manage to snatch an undecided JOP on the near left table edge and use my third section to occupy the woods on my hill. 


The stalemate broke when Gharak made a bold (c.f. rash) move on my right flank - barrelling a mechanised section towards the nearest JOP, which was undefended. This would have enabled him to capture a JOP and roll up my flank wi a fresh section. 

Except it wasn't undefended. To their misfortune, I rolled a double-phase at this most I opportune moment and out popped my platoon's PIAT. 'Thunk'....missed! Phase two: 'thunk'...kaboom! Direct hit! 

The half track exploded, taking out half the section with it. Stranded in the open, one phase of fire pinned them, then I was able to rake them with more fire, with little that could be done to extract them. 

The inevitable rout...


...and my saved CoC dice ended the turn and the fame as the German morale tumbled. 

Heroes of the day, the plucky (and rarely used) PIAT team. 


And for something slightly different to make a true gaming weekend, Gharak's little daughter (3) had been tempted into the hobby with her own game: a cute dungeon crawler called Stalagbite! From Midlam Miniatures and sourced at Vapnartak, it uses MDF tokens for dwarves exploring a hex-based randomly generated dungeon full of treasure. Obviously, the dungeon is also full of biting stalagmites and 'Jeeping Creepers' (or was it Creeping Jeepers?!')

Of course, Gharak being a true gamer, those MDF markers were quickly replaced with painted miniatures, and stalagmites made from DAS clay. The dungeon fully painted and tokens in bright child-friendly colours. And those naff dwarves replaced with sneaky goblins - plastic GW Knoblars I believe. I reckon Gharak has spent more time painting this than anything for a good few years! 


Well, the diligent fatherly work had paid off - it was a blast. A neat little game, simplified rules to make a dungeon crawl fun for two adults and one little lady - a born gamer, surely!